
Reel-to-Reel Tape Incubation Log (July 2023)
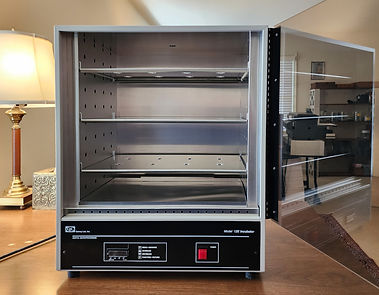
In my article “Magnetic Tape Deterioration , Part 2 - Coating Deterioration,” I described the origin and symptoms of “Sticky-Shed Syndrome” (SSS), which manifests itself in the oxide coating becoming viscous, possibly sticky, and at its worst damaging to the tape. A common method of countering SSS is to dehydrate an affected tape by incubating it (“baking,” in the vernacular). Those who have incubated reel-to-reel tape and written about it have devised “recipes” that vary significantly in recommended temperature, duration, and decision to bake. Now that I have my own incubator (Figure 1), I’m logging my experiences with the intents of honing an approach that works consistently well for me and sharing my findings with my readership.
.jpg)
Figure 1. Quincy Lab 12-140AE incubator.
Labeling: I am labeling tapes that I bake with “Tape” followed by a sequential number. Tapes incubated at the same time comprise a “batch,” and batches are also numbered sequentially.
Incubator Capabilities: Though my incubator can be operated using either Celsius or Fahrenheit, its manual uses Celsius, and to avoid missteps, so am I. Temperatures are reported herein in Celsius accompanied by Fahrenheit equivalents.
My incubator is a forced-air device that maintains a uniform temperature within the chamber. It has an effective temperature range from 8.0⁰ C. (14.4⁰ F.) above ambient temperature to 61.7⁰ C. (143.0⁰ F.). The target temperature can be set to tenths of a degree using either the Celsius or Fahrenheit scale. Once the target temperature is attained, it is maintained mostly within ±0.1⁰ C (±0.2⁰ F.), drifting occasionally by ±0.2⁰ C (±0.4⁰ F.), by a feedback mechanism much like a car’s cruise control. It has three shelves that can accommodate 10.5” reels.
Process: Tapes must be heated slowly to allow the base and coatings to expand at the same rate. Expansion can be problematic for tape near the small hubs of 3” and 5” reels. To reduce this risk, I transfer tapes from small reels to 10.5” reels, which have substantially larger hubs.
Since each temperature change must be set manually, I can realistically accomplish this in 18 hours—from 6:00 a.m. to midnight. The first setting must be 8.0⁰ C. (14.4⁰ F.) above ambient for the incubator to function properly, and I therefore allow two hours for the tape to stabilize at this first step. Thereafter, I increase the target temperature about 1.0⁰ C. (1.8⁰ F.) every 50 minutes, ending at 50.1⁰ C. (122.2⁰ F.). I chose that value so that the final incubation temperature would fall below 50.0⁰ C. (122.0⁰ F.) only a small fraction of the time, and then by only 0.1⁰ C.
Once the final temperature has been attained (50.1⁰ C. (122.2⁰ F.), I allow tapes to incubate for eight hours overnight.
At the end of the eight-hour incubation period (the morning of the second day), I perform the cooldown process by reducing the target temperature by 0.4⁰ C. (0.7⁰ F.) every 30 minutes until around midnight, allowing it to sit at an intermediate temperature while I sleep, and continuing reduction the morning of the third day until the temperature reaches 8.0⁰ C. (14.4⁰ F.) above ambient. At that point, I power down the incubator and leave the tapes in the chamber until the morning of the fourth day with the chamber door remaining closed and its small vent blocked.
“Material Test”: One of the examinations I perform in assessing tape deterioration is what I’ll refer to as the “material test.” I wrap a strip of lint-free material around the cylindrical barrel of a ball-point pen and, with the tape threaded directly from the supply reel to the take-up reel, position it as if it were a tape guide (see Figure 2).

Figure 2. The “material test.”
Batch 1
Unfortunately for my testing purposes, I had disposed of most of my 1960s-vintage tapes before starting my business, including all that might be considered of dubious quality and therefore susceptible to SSS. The two Batch 1 tapes I incubated had been left with me by customers who did not want them returned. Incubation used the process described above. Ambient temperature was 22.0⁰ C. (71.6⁰ F.). Ramp-up time was just over 17 hours, and cooldown time was about 34 hours.
Tape 1: Maxell 35-180B, 3600’, 3.75 ips, 10.5” reel
The pre-incubation examination determined that the tape was safe to play, not surprising since Maxell tapes have a reputation of being resistant to SSS. The light brown accumulation from the material test (Figure 1-1-1) was not a cause for concern. Since I had no desire to preserve the tape’s recording, I decided to incubate it to see what would happen. For testing purposes, I digitized the first half hour of Side 1 before and after incubation.

Figure 1-1-1. Pre-incubation material test of Tape 1 (both directions).
The volume setting on my amplifier was inadvertently lowered during the time between the pre- and post-incubation digitizations, and the post-incubation waveform showed a decrease of about 2.0 dB compared to the pre-incubation version. Upon examining spectrograms for both versions, the reduction was evident in frequencies up to 8 KHz, but I was surprised to find no apparent amplitude change in low-level noise between 10 and 20 KHz. (Unfortunately, while the difference between the spectrograms was evident on my large monitor, reducing the spectrogram images to a size that will fit in this article rendered the differences visually imperceptible.)
The original recording was of a radio broadcast, and I would characterize it as oversaturated and exhibiting a somewhat muddy quality. The quality of the post-incubation audio sounded to me to be identical to that of the pre-incubation audio.
Tape 2: Scotch 176, 600’, 3.75 ips, transferred from a 5” to a 10.5” reel
Few problems have been noted with Scotch 176, though they have occurred on occasion. This particular tape was one of the exceptions. Figure 1-2-1 shows thick accumulation of binder residue splinters during the material test, indicating the presence of SSS. Because of the tape’s condition, I digitized it only after incubation.

Figure 1-2-1. Pre-incubation accumulation of Tape 2 residue indicating Sticky-Shed Syndrome.
The post-incubation material test accumulated slight residue along the tape’s edges (Figure 1-2-2), indicating the tape was safe to play. The recording was of a man speaking and was comprehensible (though it would benefit from reduction in low frequencies). Noise above the vocal range could be easily reduced. There were some narrow bands of noise within the vocal range that appeared to be the sound of the tape transport mechanism during the original recording. The net result is that incubation rendered the tape playable without affecting the quality of the audio.
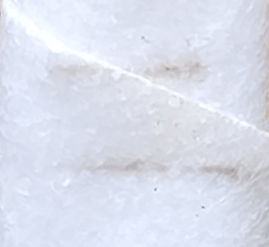
Figure 1-2-2. Post incubation accumulation of Tape 2 residue indicating successful dehydration.
Summary of Batch 1 Findings
-
Incubation rendered the tape exhibiting SSS (Tape 2) safe to play.
-
Post-incubation audio from both tapes was of acceptable quality.
-
For the tape not exhibiting SSS (Tape 1), an inadvertent reduction of the amplifier volume for the post-incubation digitization was evident in frequencies up to about 8 KHz but surprisingly had no apparent effect on low-level noise between 10 and 20 KHz.
Back to Paul’s Blog & Contents