
Answering Machine Cassettes (May 2023)
Before the introduction of digital answering machines and voicemail, answering machines employed magnetic tape, first with Compact Cassettes and later Microcassettes. There were typically two cassettes per answering machine, one to hold the outgoing message requesting the caller leave a message “after the beep,” and one to record incoming messages left by callers. Customers sometimes wish to have incoming or outgoing messages converted to a digital audio format, typically MP3. Their desire is to preserve voices of loved ones, messages, or conversations and potentially to share the audio files with family or friends.
Incoming Messages
Converting incoming messages is typically straightforward, as vintage answering machines allowed users to swap off-the-shelf Compact Cassettes or Microcassettes for ones containing content they wanted to save. I simply begin the conversion process using my cassette deck or Microcassette recorder, depending on what the customer has given me.
Generally, the only challenge is the audio quality. As a cost-saving measure, answering machines often did not have an erase head, relying instead on the record head to record over any previously existing content. This process is not perfect, and noise will invariably accumulate from repeated recordings. (Increasing noise was another reason a user might replace an incoming message cassette.)
Outgoing Messages
Outgoing message cassettes used short tapes. Some were very short (10 to 15 seconds—“full message”) and would hold a single, fixed-length message. After it had played the tape’s full length, the machine would generate a beep and begin recording on the incoming message cassette. A beep or tone would be recorded on the incoming message cassette before or after a caller’s message to mark where one message ended and another began during playback.
Other outgoing message cassettes had a somewhat larger capacity (60 seconds—“play to first beep”) and allowed greeting messages of any length up to the tape’s capacity. When the user finished recording the outgoing message, the device would record a beep on the outgoing message tape. When the device answered an incoming call, the greeting message was played until the beep was detected. At that point, recording commenced on the incoming message cassette (with a beep inserted before or after the caller’s message). The outgoing message tape continued running to the tape’s end, but playback was muted to prevent any audio content left over from previously recorded greeting messages from being heard.
Physically, outgoing message cassettes used a tape loop rather than the usual reel-to-reel configuration found in cassettes. In lieu of physical ends of the tape, there was a short metallic strip placed where the two ends of the tape were spliced together to form the loop. That strip denoted the logical beginning and end of the loop. Parenthetically, metallic strips were used in 8-track cassettes to trigger track changes during recording or playback. They were also used for 1960s-vintage reel-to-reel tape decks with an autoreverse capability; sensing a metallic strip on the leader triggered the change in playback direction.
The telltale sign of a looped tape configuration is that reel sprockets that are normally visible are missing for one or both reels—a safety precaution to prevent rewinding or attempting to play a Side B, both of which would prove disastrous. In my first project with an outgoing message cassette, the cassette lacked sprockets for both reels. When I loaded the customer’s cassette into my deck, the deck never got past the step where it tried to ensure proper tape tension between the reels, since that requires reel sprockets. Fortunately, I was able to play the cassette in a Sony Walkman, which apparently doesn’t try to adjust tape tension. While digitizing, I let the tape run through its loop several times, thereby ensuring I had captured the desired content cleanly.
The resulting audio file represented the full length of the loop, and it contained the first outgoing message followed by a beep. This was an instance of a “play to first beep” cassette; it also contained fragments of earlier messages of increasing length, each with its own beep.
The second of my outgoing message cassette projects required a more aggressive approach because of the cassette’s design. Note in Figure 1 the absence of sprockets for one of the reels, as well as the warning to insert the cassette so that it would play in only one direction. Note also the four holes near the bottom edge of the cassette arranged in two pairs.
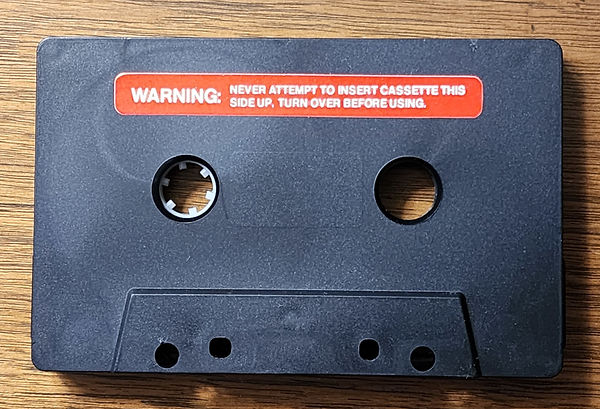
Figure 1. Back of an outgoing message cassette with warning label.
The front of the cassette (Figure 2) looked pretty much like the back except that it bore the product label rather than the warning. “10 SEC.” on the label indicated that this was a “full message” cassette. More critically, one of the four holes evident in Figure 1 was missing. Cassette decks have a steel pin that fits into an outer hole, and the absence of the hole on one side prevents loading the cassette the wrong way. My deck refused to accept the cassette (even though it was inserted correctly); and although I could load it into the Walkman, the Walkman wouldn’t play it. I needed to remove the tape and splice it into another cassette.

Figure 2. Front of an outgoing message cassette with product label and missing hole.
Knowing that I’d be unable to return the tape to its original cassette, I obtained the customer’s permission to proceed with dismantling the outgoing message cassette and extracting its tape. Figure 3 shows the looped tape configuration.

Figure 3. Inside an outgoing message cassette with a looped tape.
I removed the tape and found the metallic strip (Figure 4). The other objects in Figure 4 are a spool of splicing tape and a splicing block, which I used to hold the tape in place to keep it from curling into the shape of a worn-out Slinky.

Figure 4. Metallic strip on an outgoing message tape loop.
I cut the tape in the middle of the metallic strip, ending up with a 20” strand (just enough for the 10 second capacity). I spliced one end to the leader in a scratch cassette and the other end to the scratch cassette’s magnetic tape. I was then able to digitize the 20” of answering machine tape normally, clean up the audio, and provide the customer with the requested MP3 file of the outgoing message.
Back to Paul's Blog & Contents